
In previous articles I have examined the correct flashing details for the various roof junctions such as valleys and side abutments, so in this article I will take a look at how the flashings should terminate where a roof slope meets another roof slope or wall. Traditionally, saddles are fashioned from lead sheet, usually Code 3, 4 or 5, depending on the situation and exposure. Increasingly though, although lead is still a great material for durability and workability, roofers and specifiers are turning to alternative flashing materials and systems, either due to price reasons, concerns about the use of lead generally, or even to prevent the risk of the subsequent theft of the lead from the roof. Lead alternative systems are generally lighter in weight than lead and there is no risk of staining, therefore coating with patination oil is not required. One such example of a lead alternative flashing system is Wienerberger’s Koraflex. This is an aluminium roll, fully coated with a butyl adhesive. It is available in colours to either match lead or match the tiles. Some customers want a flashing that looks like lead, whereas others want it to not look like lead to deter lead thieves.
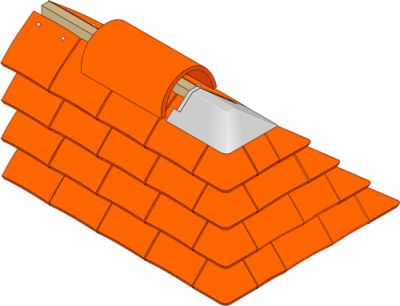
Junction of ridge with wall
Where a duo-pitch ridge line meets a wall, the junction of the tiling or slating of the roof slopes at each side is weathered with a flashing system, the particular method being dependent on the type of tiles or slates; for example, a simple cover flashing for shaped or profiled tiles, a secret gutter for single lap flat interlocking tiles or individual soakers for double lap plain tiles and slates. At the ridge, the flashing must continue over the ridge line to maintain the integrity (weathertightness) of the junction. This is known as a saddle. A typical saddle is installed under the end ridge tile and extends at least 150mm along the ridge line from the wall, terminating in a welt to ensure water cannot run over it into the roof space. The saddle should extend at least 150mm down each roof slope. The saddle should turn up the wall by the same distance as the cover flashing and dress into the brickwork joints or chasing. For relatively low pitched roofs, a lead or lead alternative saddle can be formed by bossing into shape. For steeper roof pitches it may be necessary to form a lead saddle by lead welding. Lead alternative saddles can be formed from multiple pieces and bonding together to create the required shape.
Top junction of a hip with a wall
The saddle installed at the point where a hip line meets a wall is similar to the saddle as described above for the junction of a ridge with a wall, the difference being that it is installed over the top hip tile, rather than underneath it. The saddle then becomes, in effect, an extension of the top abutment flashing and joins it to the side abutment flashing. A very common mistake is to install the saddle underneath the top hip tile, rather than on top of it. But, if the saddle is installed under the hip tile, driving rain can run down the wall between the saddle and the hip tile. The risk is, because the saddle and hip line is sloping, water will run down the saddle into the roof space.
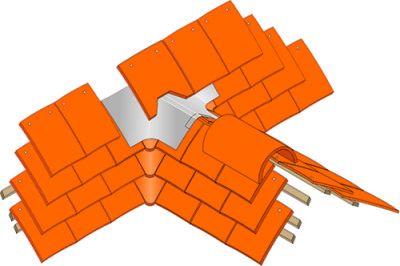
Top junction of two valleys
A saddle is required to weather the junction at the top where two valleys meet. For open valleys, the saddle becomes an extension of the valleys; ie the valley upstands, welts and open width are carried through the junction. The saddle should extend at least 150mm over the valleys lining on each side. At the top of the internal roof slopes, a ridge line will terminate at the point where the two valleys meet. A common mistake is to mortar bed the end ridge onto the saddle and take it across to the main roof slope. But for open valleys, the saddle should carry that valley through and so the end ridge tile should not cross the saddle.
Saddles are also required for other forms of valley junctions, such as plain tile tiled valleys, soakered plain tile and slate valleys or the preformed mortarless valleys increasingly being used, particularly with single lap tiles. When used with plain tile valley tiles, the saddle extends under the end ridge tile and ends in a welt in the same way as described earlier for the junction of the ridge with a wall. The saddle extends under the tiling of the main roof slope by at least one full tiling course (see illustration).
Junction of hips with a ridge
Where a hip, or multiple hips meet a ridge, a saddle is normally installed to weather the junction, although this is not always necessary when using dry fix ridge and hip systems. For example, where dry ridge rolls are used on the ridge and hip, these can be lapped at the junction to maintain weathertightness – check with the supplier of the dry ridge and hip systems.
Where a saddle is required, this should be installed to extend along the ridge line and under the end ridge by at least 150mm, ending in a welt as described earlier for the junction of ridge with wall saddle.


