
Traditional roofing details stand the test of time and are fine for the majority of situations. However, at a low roof pitch, components of a roof system may be working at the limit of their capabilities, meaning more chance of failure; i.e water leakage, under extreme weather conditions. Areas such as eaves, abutments and window surrounds require careful detailing to ensure a durable and watertight roof system. At eaves, on very low roof pitches, it can be difficult to achieve an adequate fall for water run-off from the eaves course tiles and the underlay. Roof window surrounds can be particularly tricky to detail effectively, even though the window flashings work perfectly well at low pitches.
Detailing a low pitch eaves
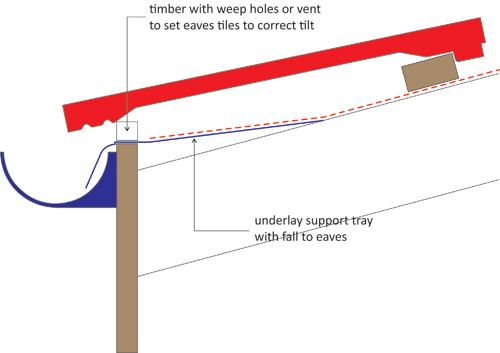
The lower the roof pitch, the more difficult it becomes to construct an effective eaves system, particularly where roofspace ventilation is required. Remember that the eaves course tiles carry all the rainwater that the roof face has collected and must shed that water safely into the gutter. It is therefore important that the eaves course tiles be set at the same relative pitch as the tiles above in the general roof area. It is equally important that an adequate fall is set in the underlay and to ensure that the underlay is fully supported so that it does not drape and form a trough behind the fascia.
The fascia height, with over fascia ventilator if required, must be set to allow an adequate fall in the tiling and underlay. Sometimes, these two requirements can be at odds; for example, getting the required pitch in the tiling can result in no fall in the underlay. If this is the case, set the fascia height to give a fall in the underlay, then set the tile pitch using a ventilator strip or tilt batten fixed over the underlay support tray – see drawing ‘A’. If a batten is used, it must be notched to allow free flow of water from the underlay into the gutter.
Support the underlay behind the fascia using underlay support trays. Overlap these by 100mm and seal the laps using a suitable sealant. The underlay should overlap the underlay support trays by at least 150mm and can be bonded to the underlay support trays using adhesive or double-sided adhesive tape.
Remember that the eaves course tiles must be twice fixed; normally head nailed and tail fixed. Seal any fixing perforations through the underlay support trays using sealant or bituminous nail tape.
Detailing side abutments
It is always important, regardless of roof pitch, to use the correct weathering detail at side abutments. For double lapped slates and plain tiles use soakers, for flat interlocking single lap tiles use a continuous secret gutter and for profile tiles use a cover flashing that extends at least 150mm over the tiles and covers one continuous roll.
A common mistake is to use a simple cover flashing with flat interlocking tiles – this may work at steeper pitches; i.e 30 degrees and over, in sheltered areas and with short rafter lengths, but otherwise there is a risk that water will run between the flashing and tiles and leak into the structure. Therefore, the appropriate detail is to install a side, or ‘secret’ gutter to capture water that runs sideways off the abutment tiles. A cover flashing can be installed in addition to the secret gutter to prevent debris such as leaves and pine needles etc. from clogging the gutter. There are also preformed rigid soakers available for use with flat interlocking tiles.
Detailing around roof windows
Although roof window manufacturers supply perfectly adequate flashings to surround their windows, remember that the tiling needs to pass over the flashings and achieving a perfect seal between the tiles and flashings can be difficult. Although water will generally run off the tiles into the window flashings, under some conditions, especially at low pitches, water may be driven between the tiles and flashings, into the roofspace. Leakage through the tiling is more likely around roof windows if there are a few small gaps in the tiling where the tiles ‘kick’ as they pass over the flashings.
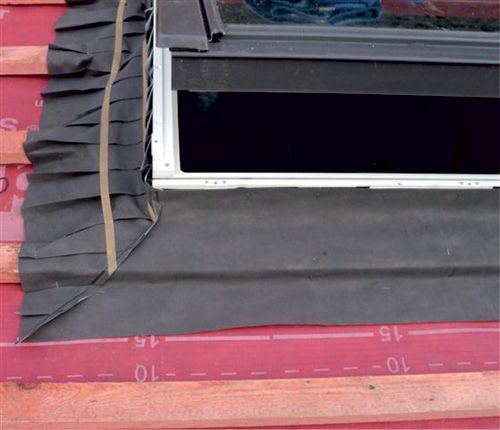
To ensure an efficient seal around a roof window, the general underlay should turn up against the window upstands and be taped or bonded to the upstands. The corners are vulnerable to leakage where the underlay is cut, therefore it is important to use sealing tape at these points.
If the window manufacturer supplies a window ‘collar’ or ‘skirt’, this should be fitted over the general underlay and taped or bonded to the window upstands – see photo ‘A’. The outer edges of the collar can be taped over the general underlay and tile battens. A cut is made in the general underlay above the roof window so that the window collar is pushed under and lapped by the underlay. This junction can be taped also.
Once the window flashings are installed, the tiles can be laid over the flashings, taking care to minimise ‘kicking’ by removing tile nibs if necessary. Tiles can be pulled closer to the flashings by fixing them with screws into the battens, rather than nails, taking care to avoid fixing through the flashings.
In summary
As I said in my previous article, contractors want to do a job as efficiently and cost-effectively as possible, be paid and to not need to go back to rectify complaints. Following these simple recommendations will ensure that each job is a success, first time, with far fewer call-backs. For further information on how to construct a watertight sub-roof, download the Wienerberger Low Pitch Installation Guide.


