
Following on from my article last month on the versatility of plain tiles, this month, I will examine the use of plain tiles in walling, or, as it is more commonly known, vertical tiling.
Firstly, a quick recap on the rules for vertical tiling. For the purposes of technical design, BS 5534: the British Standard Code of practice for pitched roofs and vertical cladding defines a wall as any surface at a pitch of 75 degrees or greater from the horizontal. It also states that for walling, the headlap for double lapped tiles should be no less than 35mm, meaning that standard size plain tiles, at 265mm long, should be laid at a maximum gauge of 115mm when tiling vertically. The side laps should be no less than one third the width of the tiles, typically 55mm, although this can be reduced to 38mm with Winchester cuts where there is an overhanging verge. All tiles should be twice fixed, normally using either alloy or stainless steel nails or stainless steel screws, with a wind load calculation carried out to determine if the proposed fixings are adequate.
The use of vertical plain tiling varies by region in Great Britain; for example, it is used extensively in the South Eastern counties of England, especially Kent and East Sussex, often covering the whole of the exterior walls from the first storey up to the eaves. In other areas, it may be only used on dormer window cheeks or between bay windows.
Mathematical tiling
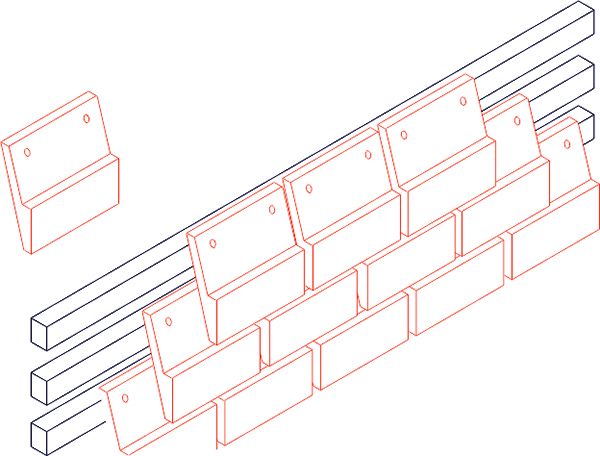
Mathematical tiling was popular as a cheaper alternative to exterior brickwork during the period of the brick tax that ran from 1784 until 1850. As well as the cost advantage, mathematical tiles, being lighter, were ideal for timber-framed buildings and required less skill to lay them than traditional brickwork. They are fixed to timber battens, with the lower, exposed portion of each tile resembling brickwork laid in a header or stretcher bond pattern – see illustration below.
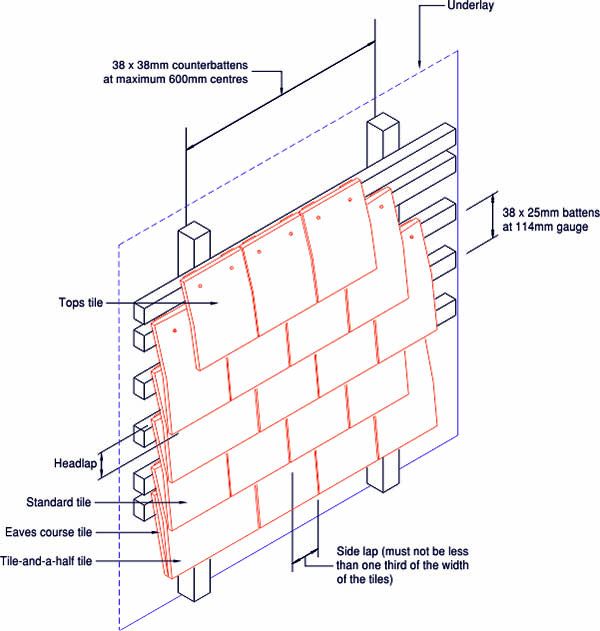
A key consideration when installing vertical plain tiles is how to secure them to the wall. In theory, the tile battens can be fixed directly to the wall, though this can be impractical due to the number of fixings required and the actual condition of the masonry. Normally, it is better to firstly secure counter-battens to the wall. These can be secured using fixings appropriate to the type of wall; for example, old brick, new brick, blocks etc. In the case of new masonry, ask the brick or block manufacturer for their recommendations on the use of fixings into their products, or consult a fixings supplier. Then, the tile battens can be nailed in the usual way to the counter-battens. The underlay layer is positioned between the battens or counter-battens and the wall.
Standard plain tiles are normally used for vertical tiling and special fittings are available to complement them, such as external and internal corner tiles. These are handed to maintain the broken bond pattern and are available to suit 90 degree and 135 degree corners. A point to note is that corner tiles are designed to match the actual pitch of the tiles, not the pitch of the wall, therefore it is important that the eaves ‘kick’ is set correctly to ensure the corner tiles fit properly.
Feature tiles
Feature tiles are also popular for vertical tiling, with various shapes available, such as Fishtail, Club, Bullnose and Arrowhead (also known as ‘Pointed’). Feature tiles are sometimes used on pitched roofs also, but remember that the nature of the tile shape means that the headlaps and sidelaps are reduced, so the roof must be sufficiently steep and sheltered to prevent water ingress.
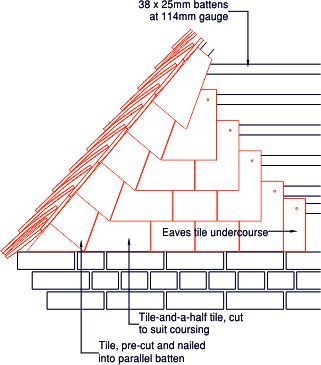
There are many popular details available to vertical tiling installers, including variations of Winchester cutting. The one shown here (see below) can be used where the vertical tiling abuts roof verges at pitches from 45 degrees upwards. In this version, the edge tile is a tile-and-half-tile, turned so that its long edge is parallel with the roof pitch and the opposite edge is cut such that the ‘turn angle’ is shared with the second, neighbouring tile. The second tile in the course will normally be a tile-and-half tile also, to maintain the sidelap. Where the minimum sidelap cannot be maintained, a lead or lead replacement soaker should be fitted to weather the joint.
Where there is a storey above a window head, the ‘eaves’ of the vertical tiling above the window must not allow fire to spread into the batten cavity, therefore the vertical tiling soffit must resist fire spread. For more information on this and many more vertical tiling details, the Roof Tile Association Vertical Tiling Guide is available from their website at:


